
The Rail Watch Monitoring package allows the use of a Software Defined Radio for direct digital monitoring of ATCS signals. It uses Gnu Radio to receive and digitize multiple parallel channels, and custom software to decode the transmissions. The final ATCS data packets are then available as an ATCSmon compatible server, and a copy of received data is sent to the Rail Watch web site.
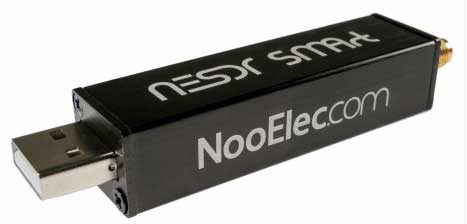
Although both of these SDRs work, in our somewhat limited testing (2017-01), we were able to decode about 2.5-3 times more packets from a distant BCP using the NESDR Smart than the RTL-SDR dongle. It also has a more accurate TCXO and is smaller in size, and the optional mini-antennas are higher quality.
Both dongles have enough bandwidth to receive all 6 ATCS channels simultaneously, on either the BCP or MCP side. It is possible to receive both BCPs and MCPs using 2 dongles.
Eventually, our goal is to provide support for a few platforms, possibly something like the Raspberry Pi that could be used to build a small, low-cost, low-power, monitoring station. The Windows version is only our first test environment.
updates:
Unzip the rwmon.zip file into the directory.
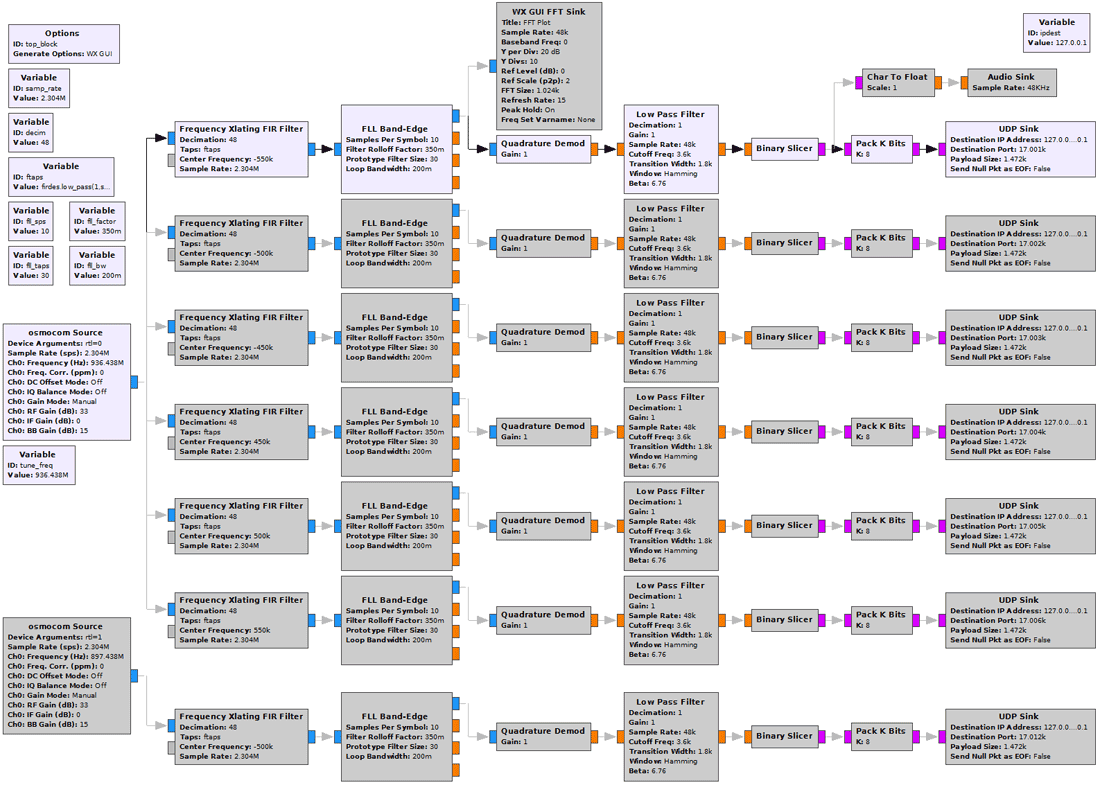
On the far left you will see the osmocom Source block, this is what configures the SDR dongle and is the source of the digitized RF signal. If you use a different dongle this block may need to be modified, and you are on your own. You will see the Ch0 Frequency setting of 936.438M (rounded up for displaying from 936.4375). This is the center frequency of the 6 ATCS BCP channels. If you want to receive MCP frequencies instead you will need to change it to 897.4375M. To change the frequency, look for a block in the top left labelled Variable ID: tune_freq and double-click on it. It will display the BCP value 936437500. Change it to 897437500.
Now, note there are 6 rows of blocks, each one is for an ATCS receiver on channels 1 through 6. The frequency for each channel is set by the Center Frequency of each of the Frequency Xlating FIR Filters (as an offset from the tune_freq). Note the top row of blocks is lighter colored (ENABLED) and the bottom 5 are darker (DISABLED). So only ATCS channel 1 is enabled by default. Enable or Disable all the blocks in the particular rows you are interested in monitoring (maybe just start with one for testing). You do this by selecting a block or blocks and then hitting E or D.
Notes on UDP Sink block. This sets up the destination for the digitized, bit-sliced data stream. By default they are all set to send to 127.0.0.1 (the same computer) and ports 17001 through 17006 corresponding to each ATCS channel. You can send them to a different computer by changing the variable ipdest.
Notes on Audio Debugging. At the top right notice 2 blocks, Char-To-Float and Audio Sink, both disabled by default. If you enable both of these then you can listen to the received signal on your audio output. You'll probably want to disable them when you are done with setup and testing. Note the audio input comes from the output of the Binary Slicer for channel 1, as shown by the line connecting them. If you want to listen to another channel, select this line and delete it, and draw a new line to the channel you want to monitor. Do that by clicking once on the purple output box of a binary slicer and then the purple input box for the Char-To-Float for the Audio Sink.
Note on WX GUI FFT Sink block. This block at the top center will display an FFT plot of the received signal and can be useful for debugging receiver issues. You can enable it and connect it to any of the channel outputs for viewing.
Note on using 2 dongles. The bottom row shows how to configure a second dongle so you can receive both BCP and MCP frequencies simultaneously. The Device Arguments are set to rtl=1 to specify the second dongle and the Frequency is set for the middle of the MCP range (assuming you are using the BCP frequency for the first dongle). The example only shows it set to receive channel 2 as per the Center Frequency setting of the Filter. You can change this to whatever you want or add multiple MCP channels as per the first dongle setup. For the UDP Sink port# we use the range 17011-17016 so we don't overlap with the first dongle.
Now that you have things setup, use File, Save As and give your setup a new name.
You can now hit the PLAY button on the top bar (white right triangle). This will start running the program, and you will hear audio if things are working. You should be able to hear occasional data blips on an active frequency. Hit the red X button to stop it. If you can't hit play and the circle-with-a-dash in it is on, that means you have a problem with your diagram (usually a missing connection or you forgot to enable or disable some blocks).
Later, once you have everything setup and working well, you can run your program from a command prompt instead of through GRC. You do this by starting GnuRadio Command Prompt instead of GRC. At the command prompt you enter python top_block.py.
RXATCS needs to be run from a Windows Command prompt. From the Windows Start menu you can enter cmd to get one (or look under Accessories and Command Prompt). Connect to your RXMON directory (for example, CD C:\RXMON). Do a DIR to verify the rxatcs.exe file is there. There is a companion file called uid.txt that contains your encrypted Rail.Watch email address. It must also be there for things to work. rxatcs will occasionally send your uid to Rail.Watch so we can keep track of who is sending what data streams, in case we need to contact you about problems or for other admin purposes. So you should not share your downloaded RWMON package with another user, they should get their own copy so it contains their own uid.
RXATCS is run by typing rxatcs options where options is replaced with various things.
So if you want to receive ATCS channel 1, you can type ./rxatcs -d and use the defaults. The d option is useful for testing but you can leave it out later for operating mode. Whenever a valid packet is received it will be displayed in the command window like this:
c:\rxmon> ./rxatcs -d
rx: #0 05 2c 03 79 47 38 76 0e 78 aa 97 8a a6 a2 a2 1e 58 00 00 00 00 00 00
rx: #1 05 2c 03 79 47 38 6e 0e 78 aa 92 aa a2 a2 a2 fa 22 00 00 00 00 00 00
rx: #2 05 2c 03 79 47 38 4a 0e 78 aa 97 8a a2 a2 a2 fd 73 00 00 00 00 00 00
rx: #3 05 2c 03 79 47 38 02 0e 78 aa 92 aa a6 a2 a2 ee 10 00 00 00 00 00 00
rx: #4 05 2c 03 79 47 38 06 0e 78 aa 98 1a a8 a2 a2 60 19 00 00 00 00 00 00
rx: #5 05 2c 03 79 47 38 f0 0e 78 aa 92 aa a4 a2 a2 b5 14 00 00 00 00 00 00
rx: #6 05 2c 03 79 47 38 f0 0e 78 aa 92 aa a4 a2 a2 b5 14 00 00 00 00 00 00
rx: #7 05 2c 03 79 47 38 16 0e 78 aa 97 aa 23 a2 a2 22 a2 00 00 00 00 00 00
rx: #8 05 2c 03 79 47 38 0a 0e 78 aa 92 aa 21 a2 a2 cd ef 00 00 00 00 00 00
rx: #9 05 2c 03 79 47 38 0a 0e 78 aa 9a aa 21 a2 a2 cd ef 00 00 00 00 00 00
If you are receiving multiple channels, you will need to create a Windows Command Prompt for each one, and run rxatcs with the appropriate -r command (17001-17006 for each channel you want), and you will also need to set the -t option to a different port for each channel. For example, if you are receiving channels 1 and 5 you might use:
rxatcs -r 17001 -t 4851
rxatcs -r 17005 -t 4855
Once you have rxatcs running, you can start up ATCSmon and add new servers to grab the data from rxatcs. For example, for channel 1 you would add a new data source with the name of the server set to 127.0.0.1 (your own system) and the port set to 4851.
If you want to test out different radio receiver functions, filters, demods, etc, a good way to do this is to set up 2 parallel receiver rows on the same frequency (by adjusting the Center Frequency in the Frequency Xlating FIR Filters so 2 are monitoring the same channel). Then run 2 instances of rxacts in -d mode (on different UDP Sink ports). Now you can run A/B comparisons and try out new things to see if a change improves reception or not.
That's it for now! Please send any corrections or other info to improve the instructions, or any modifications you make to the GRC code that improves reception.