The Rail Watch Monitoring package (RWMON) for the Raspberry Pi 3 and 4 allows the use of Software Defined Radios for direct digital monitoring of ATCS and related signals. It is a complete bootable system with a web based interface for easy setup. Internally, it uses GnuRadio software to receive and digitize multiple channels, and custom software to decode the transmissions. The data packets are then available as an ATCSmon compatible server or can be pitched to an ATCS aggregator, and a copy of received data is sent to the Rail Watch web site. With enough cooling it is possible to run at least 2 SDRs and receive up to 3 or 4 channels total, so you can monitor both MCP and BCP. It can also receive traffic from GE MDS SD9 radios via UDP.
Instructions for connecting to a Wifi network have been updated below.
This release should fix a problem with the previous release not working on the latest Pi4 8GB models. It also adds support for receiving Genisys protocol from SD9 radios. The audio monitoring function has been removed due to a recent O/S change, it might come back in a future release.
This is a large download (1.3GB) so please only grab it if you plan to use it.
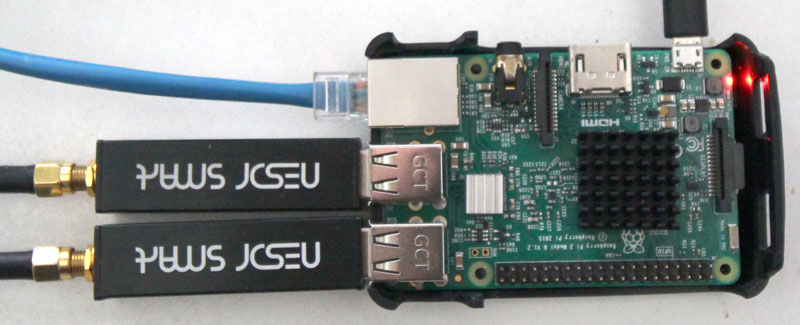
The software has currently only been tested with the NESDR Smart and RTL SDR Blog USB module V3, though it should function with any SDR that has similar capabilities and GnuRadio drivers.
Although both of these SDRs work, in our somewhat limited testing (2017-01), we were able to decode about 2.5-3 times more packets from a distant BCP using the NESDR Smart than the RTL-SDR dongle. It also has a more accurate TCXO and is smaller in size, and the optional mini-antennas are higher quality.
The RWMON software uses a lot of cpu time, so the RPi processor can get very hot. It will automatically slow itself down at around 80C, so it is important to keep it as cool as possible. The small heat sinks often sold in RPi kits won't do much. Get a larger heat sink or a fan.
Copy it to the SD Card with some image copying software.
Try Etcher, Rasberry Pi imager or
Win32 Disk
Imager for Windows. You can use dd on unix systems (dd if=rwpi.img of=/dev/
Attach Ethernet cable to RPi, insert SD card, attach at least one SDR
and turn it on. It takes about 1 minute
to boot up before you can connect to it with a browser. You can plug
in an HDMI monitor if you want to monitor the boot process (and you
can attach a keyboard if you want to login on the console). It runs a command line
interface only (no GUI).
RWMON can use the LAN port (eth0) or Wifi (wlan0) or both.
Initially, RWMON sets up Wifi as an Access Point named rwmon. From
another device, connect to this network, wifi
password rwmonwifi. This is the easiest way to first connect because the Wifi IP address
of the RPi will be known (192.168.10.2). Wifi settings can be changed by editing
the file /etc/hostapd/hostapd.conf (with Webmin or other methods).
If you want Wifi to connect to an existing network instead, you will need to do a number of things after getting connected to the system via ssh.
For the LAN port, RWMON is initially configured to use DHCP to find a local IP address
on your wired network. You'll need to figure out what IP address it was
assigned somehow, in order to be able to connect to it. If there is no DHCP server, it will
set the LAN address to 192.168.2.2. You can change this in the /etc/dhcpcd.conf file.
Or use Wifi first, and the DHCP address will show up on the RWMON config page.
The system has two users set up, pi and root. The passwords are both changeme. You can also use an SSH client (such as Putty) to connect to the RPi and get a command shell if you want.
You can use Webmin to configure your IP address and many other things. Webmin can use quite a bit of CPU time so don't leave it connected if not needed. It can also be very slow the first time starting up as it reads info about the system.
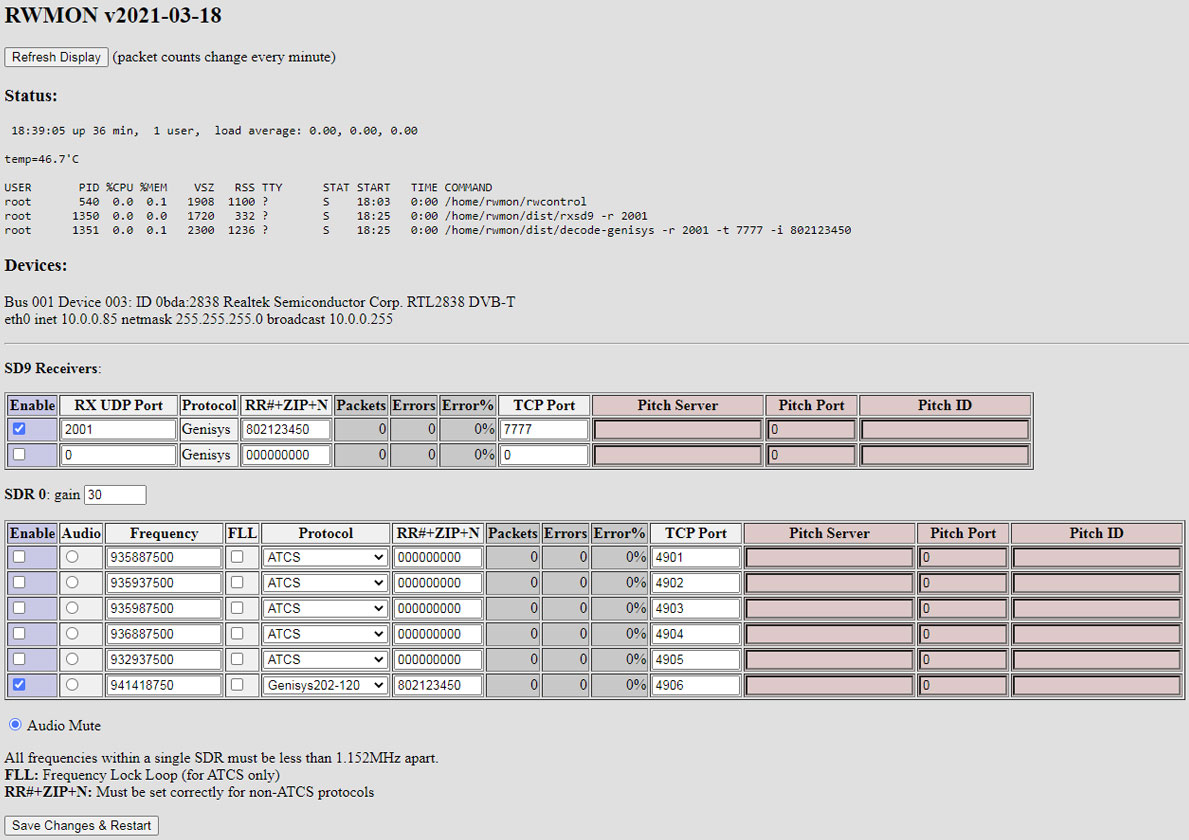
The most important info displayed is the CPU temperature. This needs to remain below 80C for best performance.
Below that you will see a listing of RWMON processes that are running.
There is a single GnuRadio python process which is what does the SDR signal
processing, and other processes for each channel you are
receiving. You will also see a list of available devices and should
see a line for each SDR that is connected. Another line will show the
settings for eth0 which is the wired network port and will contain the
DHCP addressed assigned to the Pi.
For each SDR, enter a frequency you want to receive and check the
enable box. Select the protocol. For non-ATCS protocols you must then enter
the correct RR#+ZIP+N code. See the monitoring kit for the area you are working with for
the correct numbers to use. RR# is the 3-digit Railroad Number. ZIP is a 5-digit zip code, and N is
an extra digit in case needed for that zip (usually it is zero). For example, UP is #802, so monitoring
zip code 98765 would give you "802987650" to enter in this field. If you leave the RRZIP field zero,
the channel won't be monitored. Then, pick the TCP port# to use for connecting to with ATCSmon. Pick
a different port# for each channel being monitored.
Hit the Save button at the bottom of the page to
reconfigure the software to start receiving those channels. You can
refresh the display with the button near the top of the page to see if
packet counts are going up.
You can enter specific receive frequencies for up to 6 channels per
SDR. The only restriction is that all the frequencies on an SDR must
be within 1.152MHz of each other (enough for doing either MCP or
BCPs). You can also enable or disable the Frequency Lock Loop
(FLL) which automatically tries to adjust the receive frequency to the
strongest signal it is picking up (for ATCS only). When receiving a single BCP or MCP the
FLL is useful, but when receiving multiple off frequency MCPs it may
be better to turn if off.
For each SDR you can also set the gain level, which runs from 0-49.
The default value of 33 is fairly high and good for receiving faint
signals, but might be too high for stronger ones. If you need to
receive both near and far MCP signals you could possibly set up 2 SDRs
with different gains. You can also pick any enabled channel for Audio
monitoring via the headphone jack on the RPi. Using this option will
use up a bit more CPU time.
Once you can see packets being received, the last step is to set up
ATCSmon to connect to the RPi on the appropriate port (add each port
as a new data source under the ATCSmon Options menu).
If you try to enable too many channels, the system may slow down
enough that nothing gets received.
Counters show the number of good packets received, the number with CRC errors,
and the percentage of errors of total received. You can try adjusting your setup,
frequency or gain values for best reception.
Another way to look at error rates (for ATCS protocol only) is to send the data to ATCSmon and
look at the sequence error counts.
Summary of important SD9 radio settings:
The file is about 1.3GB.
That's it for now! Please send any corrections or comments.
Networking
network={
  ssid="yournetworkname"
  psk="yournetworkkey"
}
#interface wlan0
#    static ip_address=192.168.10.2/24
#    nohook wpa_supplicant

interface wlan0
    dhcp
System Admininstration
The RWMON system is based on Raspbian Buster (v10) Lite. A web-based system administration tool called Webmin is configured to make using it as easy as possible with little knowledge of Unix systems. To use this tool, just connect to port 10000 with your browser. For example, if the RPi address is 192.168.10.2 then enter https://192.168.10.2:10000 into a browser. Note that Webmin only uses https://
Using RWMON
Connect a browser to the RPi. If via wired ethernet, you need to figure out what address it got. If via Wifi it will be at 192.168.10.2. Wifi may be the easier way to connect initially to discover its assigned wired address. Enter the address into you browser (the RWMON program runs on standard www port 80). There is a single web page that shows you status and lets you configure settings. It should look something like this, and a table will appear for each SDR that is found:
Using with GE MDS SD9 Radios
RWMON can receive data from up to 20 SD9 radios over the LAN port. Currently, it only supports
receiving Genisys protocol. SCS-128 may be added in a future release.
Configure your SD9 radios (see next section). Set them to send IP
Payload packets to the LAN address of RWMON (shown under the
Devices section on the config page). Set a different destination UDP port for each radio,
for example, port 2001 for the first radio. Then on the RWMON config page, enter port
2001 as the RX UDP port for that radio. Enable the receiver, set the RR+ZIP#, and enter a TCP port
and optional Pitch info. Then hit the Save Changes button at the bottom of the page. Each time you add
a receiver, a new blank entry will appear for another one (with UDP Port 0). To remove an entry, set its
port number to zero and Save. The error rate only shows Genisys checksum errors, if you want to know about radio errors you should check the status on the SD9 itself.
Using with Pitch
There are additional columns in the configuration display where you
can enter info (hostname, port, and ID) for Pitch (used with ATCS
Router based aggregators). This sends copies of received packets to
the pre-arranged designated host.
Quick Summary
Download the RWMON package
You need to Register and Login to Rail.Watch to see the download link below:
Terms and Conditions
By using this free software, you acknowledge that when possible it will send a copy
of any data received to the Rail.Watch web site. You will not disable this feature.
Comments